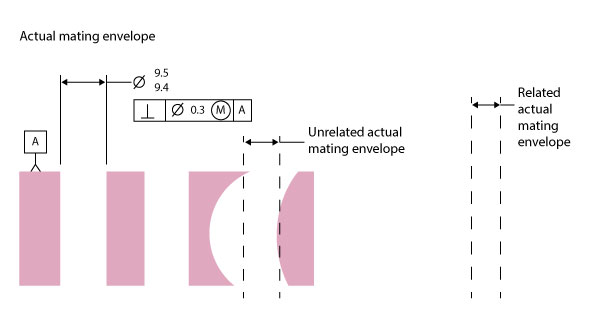
Actual Mating Envelope – The Basics
Actual mating envelope is a term that refers to a machined / manufactured part’s feature of size “as is” condition. To define what that means specifically, we need a specific individual part to talk about. The reason for that is when you have a part, or bunch of parts, that are manufactured to be alike, the fact is that for any given feature of size, part number one of any number of parts won’t likely be exactly like any other.
The outcome of the qualifier “won’t likely” will depend on the severity of how the word exact is applied to discriminate between the items of the sample. I believe these words are true but we can get caught up in semantics so let’s take a close look.
Unique Features and Mating Envelopes
In GD&T we accept the premise that nothing can be made perfectly. It’s the reason we accept no condition as viable that doesn’t have an associated tolerance as an engineering definition. When we make parts, when we make a feature of size to a specification, each part in whatever the line of parts happens to be is made uniquely. Each pc of material has its unique properties. Each machine cycle, handling operation, plating application and even down to the time of day has its own unique effect on what we do. These unique influences cause parts to have unique difference and this is where the actual mating envelope of a feature of size becomes important. When an engineer specifies a geometric tolerance to be held, such as the position of a hole, they are specifying a requirement that needs to conform to a complicated set of circumstances. In this scenario we are imagining a hole, toleranced with position, to other features. The hole, when machined to its proper size has a unique shape, at a unique size, so in order to establish where it (the hole) is, we need to have a method to identify where its axis is or in the case of a feature at MMC, where its surface is. That’s where we assess what the feature’s actual mating envelope is. It’s a method used to determine what the unique shape of a feature is that relates to the axis or surface of the feature.
Determining the Mating Envelope of Unique Features
The description common in the industry instructs the course of action to be “for an external feature a cylinder, larger than the feature, is placed around that feature and contracted until it stops on the external high points of the feature. It is assumed that the actual local size of the feature has already been assessed to meet the feature of size (FOS,) criteria. When the contracted cylinder stops on the high points of the feature it is now considered to be its actual mating envelope (ALS,) and the axis of that ALS is then considered to be the axis of the feature of size for determining its adherence to the tolerance requirement. In the case of a FOS at MMC or LMC, where the surface interpretation is used to assess the tolerance, the AME itself can be used to determine the conformance. For internal features, like simple holes, the same process is used only in reverse. A cylinder is expanded on the ID of the feature and when it meets the high points of the internal surface it is said to be that FOS AME. Using the axis or surface of the AME is chosen like the above scenario.
Visualizing The Mating Envelope
Another way to look at an actual mating envelope is a way I teach it in the college classroom and the corporate classroom. I explain that a person uses a “magic balloon.” My magic balloon is a virtual cylinder that can be expanded or contracted at will like using the dynamic zoom tool on a computer screen. You can mouse to the balloon, click and scroll up or down and the cylinder grows or shrinks in response to the mouse. You can place the magic balloon inside a hole or outside a pin and magically expand or contract it until it hits the coinciding high points on the surface of the FOS and when that happens the balloon becomes the actual mating envelope of the feature. Now there is the complication of the phenomenon with the condition of the AME being either related or unrelated. This merely means that any feature has an actual mating envelope but whether the feature is a machine dowel pin lying on a table or that same pin is pressed in place in a part designed to mount a precision circuit board in place in the chassis of a fighter jet defines two different values. The pin lying on a table can have a magic balloon contracted around its OD and the mating envelope is simply the AME of the pin by itself. However, when the pin is being assessed as a component of the fighter jet chassis its AME is not just meant to replicate the pin; it’s meant to assess the pin in its place in the chassis assembly. Let’s remember that nothing we make in our shops is perfect so when we consider the pin hole position machined in place in the chassis it is going to be some dimension different from the basic dimensions that locate it and at the same time it will be less than perfectly perpendicular to the primary datum it is assigned to. Since the hole is not perpendicular, the magic balloon expanded into its ID, (which will be the resultant AME of the pin,) needs to be corrected for. The relevance of the hole is assessed for its position in three dimensions and the related actual mating envelope of the feature is what needs to conform to the tolerance.


