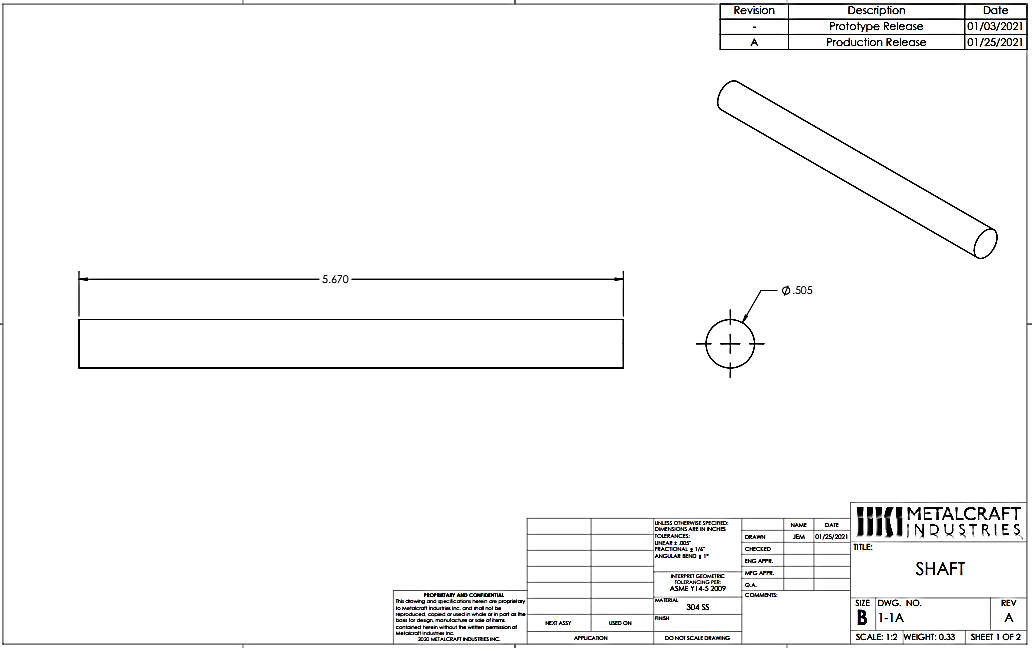
This month, let’s review some definitions and rules. Let’s imagine that we’re going to make a simple part in our machine shop. The foreman returns to the quality lab or machine shop from a morning production meeting holding a customer’s drawing for a small shaft that will be sold to a customer in the aerospace industry. The drawing is for a simple small shaft that is .505” in diameter and 5.670” in length. A look at the drawing shows us that the tolerance for 3 place decimals is +/-.005”

That means that the shaft could be turned at .505” plus as much as .005” and be acceptable, correct? We have wiggle room and should be able to hit that range of values. Well, the answer to this first question is “NO!” We can’t turn the .505” diameter to .510” and be in tolerance! Can anyone tell me why the answer is “no?”
Because this is a month-to-month blog, whenever we touch on something important about our subject, I will create a quiz for everyone to take. I just asked a question about our discussion part: If we turn it to .505” plus as much as .005” more, will it be acceptable? Then, I said that the answer is “no.” Accordingly, our first quiz will focus on why .505” diameter plus .005” is not acceptable for this part in GD&T-land. The following four statements will comprise quiz #1. Some of you, as readers of this blog, likely use GD&T. With that noted, let’s see how you do. Choose the numbered statement that you think best describes why a measured value is insufficient to approve our part’s OD.
Below is your quiz:
- In the world of GD&T, size is not everything.
- We might be living in an apartment in France.
- How the part will be measured is not identified.
- The oxen are slow, but the earth is patient.
What answer did you choose on the first quiz? If you selected number 1, 2, 3, or 4, you receive an A! Now, why did you receive an A?
Number 1: In the GD&T world, size is somewhat meaningless without knowledge about its geometry. It’s a round shaft, and it may be .510” everywhere you can put a mic on it. However, what if it’s not perfectly straight? UGH!
Number 2: Why would it matter if we were living in France? Well, if our shaft is made in France, it may no longer fit when it reaches a customer in Seattle, even though it is not above .510” in diameter.
Number 3: The drawing we’re working from describes the part, but not the gauge to measure it with. Consequently, something other than what the job requires could be created.
Number 4: “The oxen are slow, but the earth is patient” is an age-old philosophy about, among other things, the benefits of taking life one step at a time.
Now, let’s test a part for its adherence to GD&T scrutiny. The first thing we’ll learn is that there are a few things we can assume will be required when we enter the world of GD&T. One of the first is called “rule number one.” It states that there is a thing called maximum material condition that applies to all parts.

Rule number one ties size and geometry together when assessing a feature of size. Since we’re just getting started on our no definition approach to using GD&T, and because we’re going to define something, I’ll use our quiz to explain why a part’s size is not everything in GD&T. I’ll also explain why living in France may be pivotal to our discussion and why the drawing did not tell us what gauge or tool to measure it with.
Rule number one is more of a philosophy than a rule, but it is a rule. It is slightly more complicated than what we are saying, but it will serve as a starting point. Essentially, this rule states that features of size must be perfect in form at MMC. Expressed differently, it says that as a feature of size (our shaft, for example) approaches its capacity (in tolerance), it must resemble its perfect form. Let’s remember that GD&T means “geometry stuff.” Since our shaft is a cylinder, the geometry we’re concerned with is cylindricity. If combining the two ideas (size and form), we must ensure that our part is a perfect cylinder when it’s at its northernmost (biggest) measurement.
If our shaft measures .505” +/-.005”, then its biggest allowable size is .510” in diameter. If we superimpose rule number one on top of size tolerance, we can determine how we did on our quiz.
- Size is not everything. After all, when our part measures .510”, it must also be a perfect cylinder without any of its molecules extending past a .510” diameter perfect cylinder.
- In France, a 12.594 mm diameter shaft would not fit in a .5100” diameter bore unless it’s a perfect cylinder. If a Boeing 737 Max’s landing gear was made outside the confines of rule number one, this could cause a catastrophic failure.
- Our drawing did not specify that the shaft needed to be measured in a certified, 6-inch-long fixed .510-inch OD ring gauge. However, if we had such an item, we wouldn’t require GD&T because our shaft wouldn’t exceed .5100 inches in diameter or be less than perfectly straight and 5.67 inches in length.
- The oxen are slow proverb shows that a close-up study of life can be simultaneously enlightening and enraging. Specifically, there is no way to grasp GD&T without struggling over a few details. With this subject, we must practice patience.
Let’s try a new approach, called “Fun with GD&T,” to learn and understand this concept. We’ll adopt this approach to avoid a strict fact and rule-filled reading session that leans in the direction of taking a part through the process of assessing whether it meets the real-world requirements of designing, making, or quality checking a part in GD&T-land.
This method may help some people learn how to apply GD&T without first memorizing a million factoids. You will eventually learn all those factoids, but one at a time could be the superior approach. By the way, brace yourself, there are more than a million factoids.

I was a handle-turning machinist in the ’70s and, even then, we began to see GD&T controls on aerospace drawings. This required us to learn and use some GD&T concepts and we didn’t have Google to conduct research. The internet is an incredible tool to solve learning problems. Hence, it would be good to have your fingers oiled and poised above your keyboards. In addition to reading blogs on the subject, get a GD&T dictionary and refer to it when designing or making parts with GD&T controls.
Another way to learn about GD&T is by reading this monthly blog, writing down any questions, and submitting them here. Subsequently, we’ll schedule an online appointment or phone call to discuss your inquiry. There is a limit to how many, and how complicated, your questions can be. Please provide us with a little time so we can evaluate your question and answer it thoroughly.
We are currently working to implement this format, so your suggestions will be appreciated.
With that noted, I hope to talk with you soon. Did I mention the response will be from me?


